Lego Carbon Racers: Brown Beaver
Here it is, the Brown Beaver! I suppose I could've named it the Brown Bruiser or the Brown Belly-skimmer (because it rides so low), but . . . really, look at that grille. That's a beaver face.
This car design isn't really based on a preexisting Lego Racers Tiny Turbo. I was just collecting brown parts to make a brown Carbon Racer, and when I picked up that window frame piece, I thought, "I'll bet I can make a grille out of that..."
It's a shame the Tiny Turbos line died out before those pipe-like pieces at the back became common use. Those were practically made to be exhausts.
Honestly, I'm not 100% sold on the headlights I added to this model. They're pretty easy to remove; I'll describe how to do that when we get there in the blueprints. I don't know, though. Maybe you think they're what pull the whole rat rod look together.
I don't think I've ever seen a model--Tiny Turbo or otherwise--that has this type of wheel chassis with plates going underneath. Maybe I'm a pioneer. Maybe I never bought enough Legos to find out if it's been done before. Maybe both. Who knows.
One side effect of this plates-under-chassis build, I suppose, is I need to add more plates around the chassis pieces to hold the whole thing together. However, the structure is essential because the window-frame-grille piece is so tall . . . Hold on a sec. Is that the 2x1 brown flat plate? Oh boy, this thing was the source of a minor headache for me. To explain, allow me to take a break from this blueprint to show you another blueprint.
OK, so this pic was generated by Lego Digital Designer. Look, I have nothing against LDD, OK? It really helped me get off the ground when learning Lego design stuff, and I'd recommend it even before mentioning it's free. On the other hand, it's not up to date; those red pieces are placeholders because the newer parts don't exist in the database. The other trouble it has is its blueprint generator is a little drunk. Unlike Bricklink's Studio where you organize the blueprint yourself, LDD takes the models and their parts and makes the blueprint on its own. Sometimes, it works. Sometimes . . .
This is where that 2x1 brown flat plate comes in. It wasn't there in the previous LDD blueprint frame, but it's here in this one. Apparently, my revolutionary chassis design broke LDD's logic circuits, so it's telling me in this frame to make the plate suspend in midair for a minute or two. To be fair, I think the blueprint has the chassis added within the next step or the one after, but come on, you need to pry up previously placed plates to even do that.
That's my rant. Let's return to your regularly scheduled blueprint.
After that last picture, you're entitled to fewer words. So, here you go.
The original Brown Beaver design didn't have those 1x2 black plates, but that resulted in the car's cab looking too skinny. Like, if this car existed in reality, the door would be a foot wide. With this change, it'd be 18 inches wide. It's a start.
Right, if you don't want those headlights I was talking about earlier, then don't use the two clip pieces and the 2x1 plate in Step 10. Instead, use a 2x2 plate, and then forget about using the headlight pieces later.
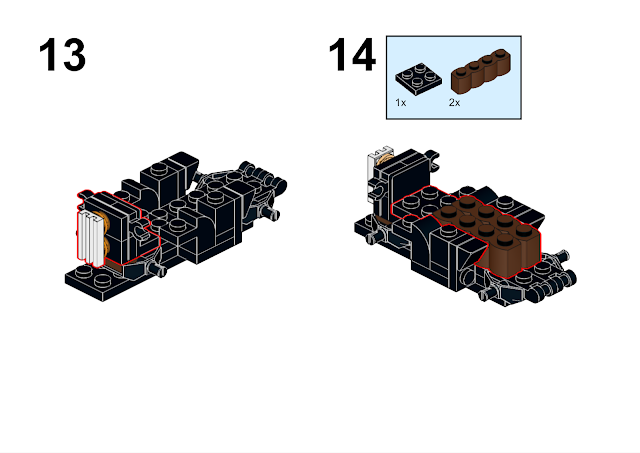
Don't have those log-type pieces? Use a 2x4 brick instead. Yeah, that's all I could think of to say here.
Hey, there are those headlight pieces! Again, if you don't want them, ignore them.
Honestly, I wasn't completely sure that window-frame piece would work. I guess the rest of the model happened because I was so surprised.
To think I was worried about how wide the car's theoretical door would be when the roof is that low. Fits the lowrider aesthetic, though, whereas the door size was more attuned to WeightWatchers.
There we go, tailpipes 'n' wheels. I had to use tires that size because otherwise the wheels wouldn't reach the ground.
That's it for the Brown Beaver, one of the more unique small-car structures I've used. In fact, it might be so unique that it might be illegal, and that's a problem when your next Carbon Racer is a law enforcement vehicle, the Dark Grey Defender!


.png)
Comments
Post a Comment