Lego Carbon Racers: Navy Nemesis
It's taken a while, but here it is, the Carbon Racer that started it all: the Navy Nemesis! This is my favorite of these Tiny Turbos-style models--and as such, it's also been reworked the most. That's the way it is with Lego favorites, I guess.
See, the Navy Nemesis in general is the oldest Carbon Racer, but this current version is--as of writing--less than a month old. It's the oldest and the newest. How about that?
Might as well talk about the design choices for a sec: See, I tried to incorporate elements from a couple of my favorite car types, Lamborghini and . . . Jeep. Weird, I know, but I think it turned out surprisingly OK.
As long as I have the car spinning here, I must point out how proud I am to have 3D air scoops on the sides. You Tiny Turbos veterans out there will remember how the scoops used to be just stickers.
If I had to call the Navy Nemesis the spiritual successor to any original Tiny Turbos model, it'd be this one from Lego set 8154, Brick Street Customs. They share the same hood, front bumper, windshield, unique sides, unique and longer-than-usual spoiler, wheels, etc.
Oh yeah, this model also once used a staggered structure where one wheel chassis was higher than the other. It made the back look too tall, though.
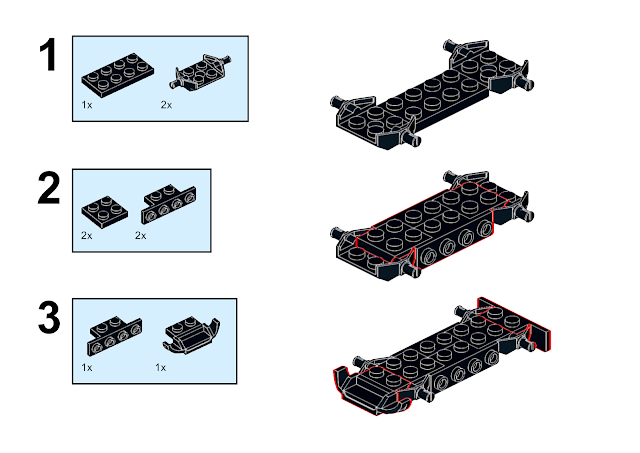
I know of a way to build these side panels (see the finished component in Step 5) so there isn't an exposed stud, but the construction would be pretty flimsy.
OK, do Steps 5-7 again but mirrored. Don't make me repeat myself.
You're making me repeat myself. As a punishment, I'm going to talk some more about this model's previous versions in the next step.
See, these side panels weren't always built like this. Simply put, they used to be made so there was a 1x4 flat piece on top of each angled wing plate, making it look more like a standard Tiny Turbo. However, when I tried this design (Steps 4-10), I liked the way those angled plates flowed with the front bumper and made the whole thing look more supercar-y. Make sense? Didn't think so. Moving on: Those clip-pieces in Step 11 are meant to be like those extra lights on the front bumpers of rally cars. That's part of the Jeep influence.
13 steps in, and the navy car finally gets some navy parts.
...and that's it for the navy parts. If you have more that'd work for this model, go ahead and use them yourself; I mean, I'm pretty sure I have a navy version of that curved piece in Step 15, but I liked the black hood stripe.
The 2x1 plate I used in Step 16 is glow-in-the-dark, making the car look terrific even at night.
The Navy Nemesis used to have a different spoiler design too, but I'm not even going to try describing that. Instead, I'll merely point out the return of Jeep influence in Step 19 (and I also find that the little peak on top of the car is reminiscent of the BAC Mono, a welcome comparison).
At last, wheels!
Well, I hope you found this model as interesting as I do (actually, I hope you didn't; as you noticed, I'm too much of a nerd about it)! The next model on the list is actually the second Carbon Racers model I built, and it's a classic--in more ways than one...

.png)
.png)
.png)

.png)


.png)

.png)
Comments
Post a Comment