Lego Carbon Racers: Green Giant Trailer
Did you like last week's Green Giant model but wish it had, you know, a little something extra? Well, here you go: I built that model with a trailer, and today, I'll show you how it's built!
This model also goes well with the Golden Rod, the Black Baron, the Blue Boombox...nearly every Carbon Racer, to be honest. That's because it's meant to carry all of those and more, and thanks to a special component which I'll highlight in the blueprints, the cars won't fall off either.
It's not my most elegant model, but come on, it's a trailer.
Here's the customary 360-rotation gif, but it gets better...
...here's what the trailer looks like when it's connected to the semi! I would've made a mockup like you see in the first photo on this post, but the model was either too large too fit to it had to shrink down too small.
Once again, this model is based on this semitrailer from Lego Racers set 8154, "Brick Street Customs" (and yes, its crooked exhaust stack still bugs me). My trailer's a little wider, though, and I like it like that; I mean, I could've built something similar with the surplus of green "door rail" plates I have, but I prefer my 6-wide build.
Yes, this is definitely a step. Pretty sure it's not my most complicated.
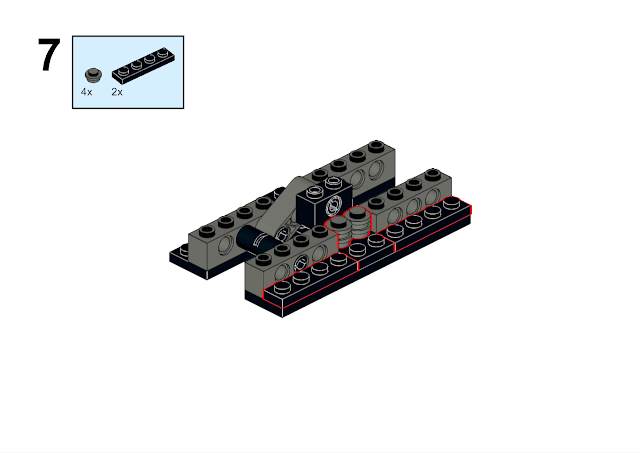
So begins the construction of the bit that holds the cars onto the trailer...
OK, see that black 1x2 technic brick in Step 5? Once this model is complete, simply attach it to the undercarriage of nearly any Carbon Racers model--or nearly any of Lego's original Tiny Turbos models, for that matter--and it will hold the car onto the trailer.
It was kinda tricky figuring out how to organize these steps in an order that made sense. I'm pretty sure I've had to redo the directions at least once.
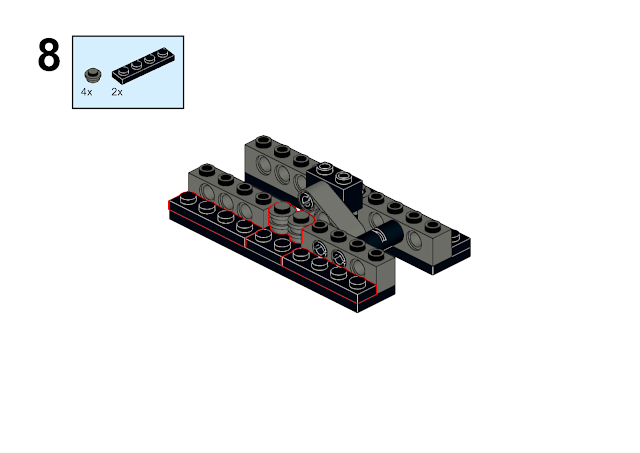
I guess you could use 2x1 plates instead of these 1x1 round plates, but then you won't get that suspension-like look which is barely visible anyway. (These round plates are easier to separate from each other than the 2x1 plates, though.)
Behold, the same step as above but in a mirror image! Ooo!
This time, I might as well take care of both sides at once.
Do I even have these bricks? I think I used different green plates.
These bricks, though, I'm all but certain I used in the original.
Here's the largest plate we've used on one of these Carbon Racers blueprints so far. It might actually be the largest one I've used on a Carbon Racers model period. I guess you'll have to stay tuned to figure out whether or not that's the case.
More plates...
Now, we have some flat plates...
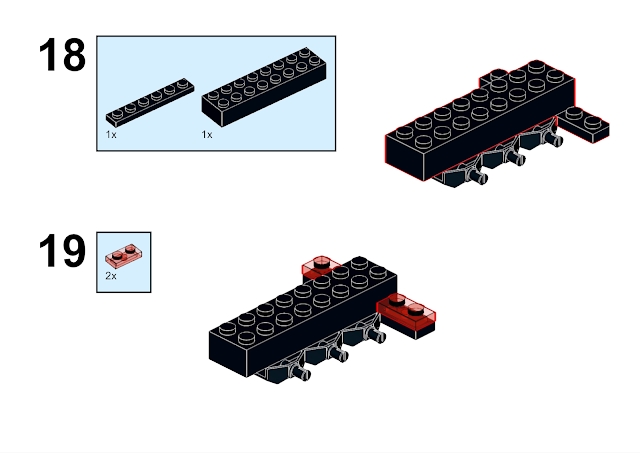
I used those grille plates, but you don't have to do the same. Regular flat plates are OK too.
Wheels! How exciting. Considering how I used 3 wheel chassis pieces on this model, this must've been a model I made pretty early on in my Carbon Racers building spree.
Hey, this might also be the largest basic brick we've used in Carbon Racers so far.
Maybe I could've combined these two steps, but I get paranoid.
Wheel ramps, engage!
Do the undersides of these ramps need this much reinforcement? Well...why not?
I hope it's obvious how that section you just built connects to the main model. Don't ask me to redo these directions; they're pretty long.
On to the other end of this model! Yes, these directions are long, but we're within 10 steps at this point.
Actually, we're within 20 steps by this point. I miscounted.
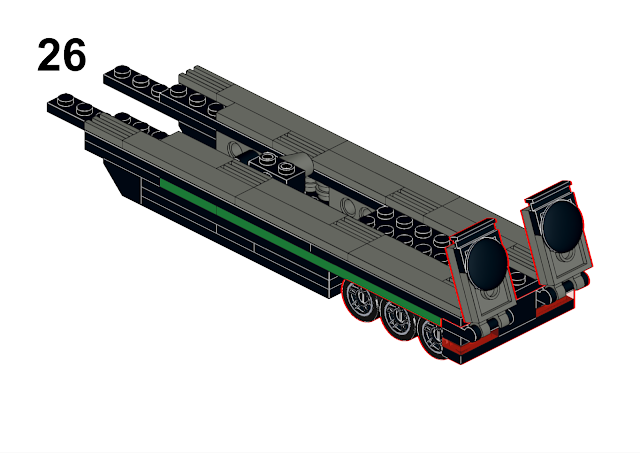
In case you were wondering, this is going to be a kickstand to hold up the trailer when it's not connected to the semi. Sorry to spoil the surprise.
I also hope it's obvious how this section connects to the main model...
Have I mentioned how long this blueprint is?
...because it's long.
Can't even think of new stuff to write, it's so long.
Here's how this trailer connects to the semi model. Another spoiler, sorry.
Yep, that's why we left that spot hollow.
Doo doo doo, more blocks here, doo doo doo...
Here's another step I probably could've combined with its earlier step.
Have all these pieces in black? I recommend using those instead.
The Lego Tiny Turbos model looks a little more elegant than mine, in my opinion. Disagree? Good for you.
I don't have round plates with these prints, so I used something else that looks similar. (Your surprise and astonishment are palpable.)
This is how I've decorated the trailer, but you're more than welcome to do it your own way.
Same step on the other side--but hey, it's the last step! Finally!
That's it for the Green Giant Trailer! Thanks for sticking around for so long. Next week, ironically enough, we're going to be building possibly the one vehicle that's incompatible with this trailer...









.png)
Comments
Post a Comment